Sunday, February 22, 2009

Paperweight & Tin.....

Well, it was suppose to be sunny today, but again the weather man has predicted wrong and it is raining. So you can only imagine how tickled I was to be able to work in my studio another day without feeling guilty of not working outside, which by the way needs lots of TLC! :) I have been working on a couple of items for this past week and manage to put the finishing touches on them as they need to be mailed out this week to a sweet friend but first I have to fill it with some eye candy so I cannot divulge what kind just in case she happens to read this. LOL!!!.

I stepped out of my comfort zone and decided to alter a tin first. For some time I had been wanting to do this and just hadn't gotten the nerve. I am pleased with the way the way it turned out and if I had known how easy it was to do these tins, I would have done it sooner! I don't own a scor-pal yet, so I used the next best thing to make my score lines on the base of the paper for the circumference of the tin which was my X-acto 12x12 paper cutter. It has indentation lines every 1/2" on the cutting board. I guess it just goes to show that you can accomplish some of the same techniques even if you do not have the proper tools that everyone else is using.
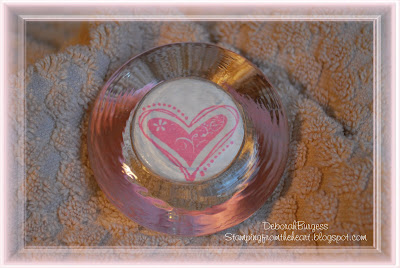
I had been at Michael's this week and saw these glass tea-lite holders and remembered seeing this idea by Becca. It took me all but maybe 10 minutes to complete this project and I think I need to go back to Michael's and get some more of these as they would be wonderful for last minute gifts. As soon as I finish posting here, I am off to Michael's! LOL!!!
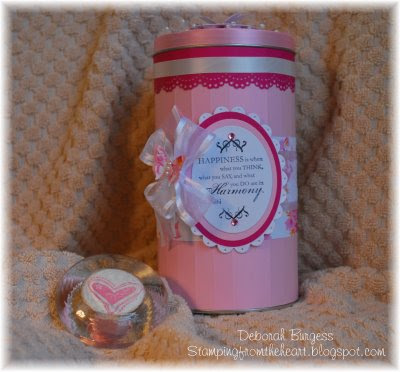
Here are the two items together that are going to my friend. I still need to make a card to go with it, but ran out of pink ribbon and the white sheer ribbon, so two more items to add to my Michael's list. LOL!! I hope you had a restful weekend and was able to get in some crafting. Stay tuned as I will have some new items to show you about the middle of the week.

Wednesday, February 18, 2009

Only In God's Timing

Everything happens in God's time but there is always the selfish part of me that says "but I want it now". LOL!

I turned in four submissions for the DT Calls and was unfortunately turned down. I am not sure why, as I feel my submissions were equally done well, but I guess not according to whatever standards they hold for selecting you.

I did however receive an email from one of the owners of the companies I had submitted to and she said "For me not to get discouraged" and did compliment me on my details and the photographing of my submission, and gave me a few pointers to help for the next time and to just keep submitting when Design Teams are being called. She also said "Sometimes it takes a bit for companies to fully realize what potential you have and the one you submitted a few months ago maybe the exact style they are looking for the next round".

I really appreciate her taking the time to email me and be honest with me. I was feeling rather down after being notified that I had not been selected, but after her email today, it help brighten my day knowing that there are still other chances out there and most importantly "Just Be Patient and Wait on God to make it happen".

Sunday, February 15, 2009

Be Grateful

Today as I was in my studio and watching the wind blow hard I couldn't help but think how fortunate we are to not having to be dealing with the ice and no power for weeks. I cannot imagine what my fellow stampers are going through and it being so cold. Here, when it gets to 32 degrees we think we are freezing and still have the luxury of having electricity and warmth. So today I dug out an image I have had for quite a while and decided to make one that states "Be Grateful". Although we are still in winter, I love the Fall and and all the changing of the colors of the leaves and the smell of different aromas that the season brings. I cannot tell you who makes this image as I had received it quite while back from a sweet SCS gal through the Wish-Rak. But I had fun thinking of the wonderful colors of Fall. I hope that you too can find something to be grateful for today.

I used Prismacolor Markers,Copics, Shimmerz, and a Clear Spica Pen to highlight the pumpkins and darker leaves. The pie and the light colored leaves were shined up with Shimmerz Candlight which made the top of the pie golden as it if it were coming out of the oven. The papers are from Bazzill and Stardust Dream Choocolate.

I just love these stamps!

Afternoon all! I hope this Sunday is finding you all well and not having bad weather. Our weather has decided to turn for the worst and the winds are hitting us hard today. Expect to get upto 80 miles per hour within the next two hours and it will bring the rain and the snow to the mountain area. So this was a perfect day to get comfy and stamp away in my studio. I have just fallen in LOVE with Susana's Custom Art & Card Designs Fairie Song Stamps. This is another one that I just had to have. It is a smaller one than Nadine, but just the same it could so easily be used for welcoming a new baby or a special occasion for Mother and Daughter Event. I choose the purple/lavendar color scheme for this stamp. I used the Primacolors Markers Lilac and Deco Pink for the clothing, Light Peach for the skin coloring, Deco Mauve to get acents to the wings themselves. Deco Yellow was used for the smaller fairy's hair and a blend of Golden Rod and Pumpkin Orange for the larger fairy's haircolor and then I accented the wings in the Shimmerz Angel Wings over the coloring of the pink and lavendar blend wings. I think it turned out rather nicely. i cut out the image with an X-acto knife and then 3-D it on top of the lavendar Martha Stewart Branch Leaf and added 2" shear ribbon and lavendar Kaiser Rhinestones. I hope you enjoy her as much I did making it. Have a great Day!

Tuesday, February 10, 2009

A Challenge and Blog Candy

Come on over to Sparkle Shimmer and Twinkle to check out the latest challenge and blog candy being offered. You have until March 1st.

Sunday, February 8, 2009

Have You Ever Had An Idea....

and it just doesn't turn out the way you thought it would? Please tell me I am not the only one this has happened too! (insert frown face here) This is such the case for this card.

I had this vision which by the way woke me up at 3:00am (lol!!!) and decided to get up and come sketch it out before I lost the idea and went back to bed. Well, I was anxious to be able to make this card that I thought when I finished it, it would just say WOW this morning! But Uhmm No! Believe it or not I worked on it this card all day (8 hours) changing this, changing that, thinking maybe I should just trash it. Heck it took me 2 hours alone to just get the wings the way I wanted them to look I used 4 coats of Shimmerz Angel Wings so the wings would take on the iridescent look so that we can all imagine of how the wings would look if we were to actually see a real fairy. I even embossed the vellum for the background part which was probably another 30 minutes since it was a metal template. Then realizing it wasn't going to fit a normal card size nor the 5.5 x 5.5 size either. I have not been fond of the larger size 9 x 4-1/4 because it seems there is so much space to cover. But since I had incorporated 2 stamps, I had no other choice but to go with the big card size. I would have rather used the normal size card, but by designing this card it helped me step out of my comfort zone and be challenged. LOL!

Stray Valentine Cat

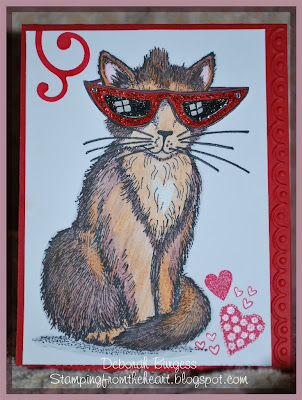
I don't know about your neighborhood, but where we live in a closed community, we seem to have a run on stray cats. The manager who keeps everything in check is always placing cat cages out to try and catch the wild strays and sometimes they are pregnant. I believe last week she was able to capture 16! Talking about wild! She received a couple of good scratches and one bit her when she went to pick up the cage handle and had to go to get a tetanus shot. Okay now that I have set the preface to this card..LOL!!! I couldn't help but look at this image and wonder how could I incorporate it as a joke to give to Mary who has been catching all the cats! A sweet lady from SCS-Glittergal (Linda) was kind enough to send me some of these images when I had such a fit over her card. I colored the cat in with Prismacolor pencils and blended them and then used just a touch of Shimmerz Candlelight to highlight the heart that was by pure coincidence that it ended with a heart. LOL!!! The glasses had to be C-O-O-L looking and of course glitzy. The inside of the card has a typed sentiment that says: "Happy Valentines Day from one COOL Cat you couldn't catch". I think she will get a big chuckle out of it. She loves Coca-Cola so we got her a case of her favorite drink. Hope you enjoy this card as I certainly got tickled many times as I was making it.

Sunday, February 1, 2009

Heart Gift Box

Since I am not a football fan and it being Superbowl Sunday (I know, I know) I decided to work in my studio today and construct up a box to be given to a SS. I had bought these Martha Stewart Heart Boxes on clearance last year at 90% off and manage to get 8 of them (would have grabbed more if they had been available LOL!!!)I decided I would make use of them this year. I looked at this box for about an hour wondering what and how to decorate it. I was skimming the stamp sets on my shelf and remembered how much I loved the Flourishes Lace Heart. I hadn't used it much since I purchased it awhile back and thought maybe the heart would be too big to use, but when I layed it upon the heart lid itself, it was perfect! I decided to use the SU White Craft Ink and then embossed it with White EP. As I finished that stage of it, I looked at the sides and wondered how I could make the rim look just as nice. First I tried some scrolls from a punch, but for some reason they just wouldn't stick no matter what glues or Xyron machine I used. My DH suggested using the top part of the Lace Heart. I said "That would be great except it has to curl around the band part and no one has yet to make an acrylic block that is curved for such items". He left the room saying "It was just a thought". Well the more I thought about his statement, I knew there had to be a way. I proceeded to ink up just half of the heart and carefully laid it on the band part of the box and moved my fingers slowly across it to make the pattern transfer. Viola!
It worked. I quickly sprinkled the EP on so it wouldn't smudge and repeated the steps for the other side. I then added pearls where the heart dipped in the middle to give it a soft elegant look. .
I added white sheer ribbon to the top of the box and then used a Martha Stewart Butterfly punch and added pearls to the body and glued it to the top of the bow. I hope my SS will like it.